Water proofing the Under Sink Cabinet in your Kitchen
by Lorenz Prem
The cabinet under the sink in your kitchen is the one place in your home where a water leak is likely to happen. It's just a matter of time. This cabinet hosts more water pipes, valves, and joints than any other room in your house. Add a waste disposal and the occasional clogged drain, and you have a very wet place. A little care to prepare for the inevitable can prevent more pungent and expensive issues like wood rot and mold. Let's take a look at what it takes to water proof the cabinet under your sink.
Managing leaks in an residential setting is all about containment. We want the water to go to place where it can be noticed and contained. Take the floor drain in a laundry room as an example. Should the washer ever leak, the water won't go very far. The drain will collect any spills.
In the kitchen or a bathroom we don't have a floor drain to work with. The objective becomes protecting the wood of the cabinet and funneling the water out of the cabinet into an area where the homeowner will notice it.
Shelf liner
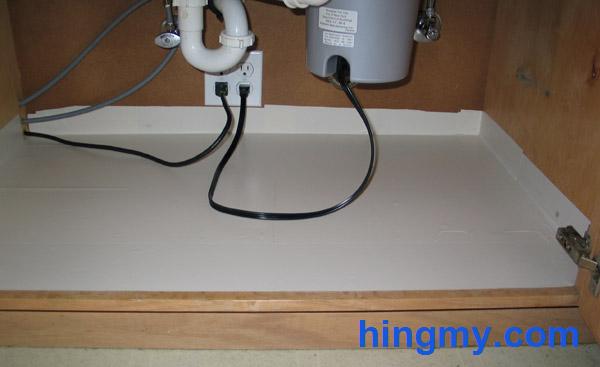
To achieve these goals, all we have to do is install waterproof, adhesive shelf liner. The liner will keep the water away from the wood surfaces. If there is a lot of water, it will eventually flow right out of the cabinet onto the floor where we want it. At this point the leak can be located and fixed.
For the liner any shelf adhesive, waterproof shelf liner will do. Quality is a secondary concern. The install will most likely not last the life of the cabinet. You'll have to reapply the liner after a few leaks or years. Shelf liner is made for a short service life. The liner is supposed to protect surfaces from dirt and grease. When it gets too dirty it is replaced. The liner is the part that takes the damage. You'll find that most shelf liners don't stick half as well as they could. That's because the liners is engineered to be just as easy to remove as it is to install. Don't overspend on the liner.
Installation
Install the liner from the front to the back. Overlap each section of liner by 3 inches or more. If you start at the front, the seams will overlap correctly creating a path for the water to flow out of the cabinet. In addition to covering the cabinet floor, extend the shelf liner 2-3 inches up the side. This is done not for water protection of the side, but to keep the water from flowing into the seam where the liner meets the cabinet wall. When that happens the liner will curl up and will have to be replaced. If you cover the walls, the water get under the liner. Your install will stay in place longer.
The pieces that cover the edges are best installed as strips after the bottom pieces are installed. Cut 6" wide strips and fold them in half along the longer dimension. This creates a seam. Lineup that seam with the corner of the cabinet and press the two sides of the liner against the cabinet wall and floor. Repeat until the entire cabinet is covered. Overlap the strips just as you did with the liner on the floor.
Installing liner without creating creases and bubbles is really hard. I have done a lot of cabinet and still can't get it done perfectly right. A laminate roller is essential for a quality install. Without one you have no chance of installing the liner perfectly. With the roller it'll still be a challenge. That's alright considering that the area in question is hidden most of the time.
Summary
Protecting the cabinets in your home from water damage is essential. That musty smell of an old kitchen can often be traced to rotting wood right under the kitchen sink. In about an hour you can prevent this problem with a few square feet of shelf liner.


