New door and window casing are a simple way to improve the quality of any room. The trim options sold at the home centers are either plain, or far too expensive. Building the trim and header in your woodshop not only saves money, but it also produces far superior results. Let's take a look at what's required to build your own custom door and window casings.
Choosing the material
Paint grade hardwood is a good choice for this project. The door casing is bound to get its share of bumps and dings during its lifetime. Hardwood resists damage, and can be repaired fairly easily. It holds up to moisture fairly well and will outlast just about everything around it. I built my casings from poplar, a cheap hardwood easily available in the Northwest. See what you can get in your lumberyard.
Alternatively the casing can be made from MDF. Unlike wood, MDF breaks apart easily when struck and swells when exposed to water. Repairs are harder to do. MDF is, however, much cheaper than solid wood. It can be a good choice where longevity is not a concern.
Softwood species like pine are not a good choice for interior trim. It's just too easy to bump into a door. Pine will not stand up to abuse for very long. You trim will look worn in a relatively short time.
Measure before you cut anything
Houses settle and move over time. Doors that have been installed square and plum are anything but after a decade or two. Don't assume your doors are all the same width. The header must be cut precisely to line up with the outside edges of the side trim.
Measure the width of each door on the inside and outside. Make a list of the door widths and calculate the width of the header for each door. The edges of the header must line up with the trim pieces below it. In my house the largest header was 1/2" wider than the smallest, although the door slabs are all the same width.

Machining the two side pieces
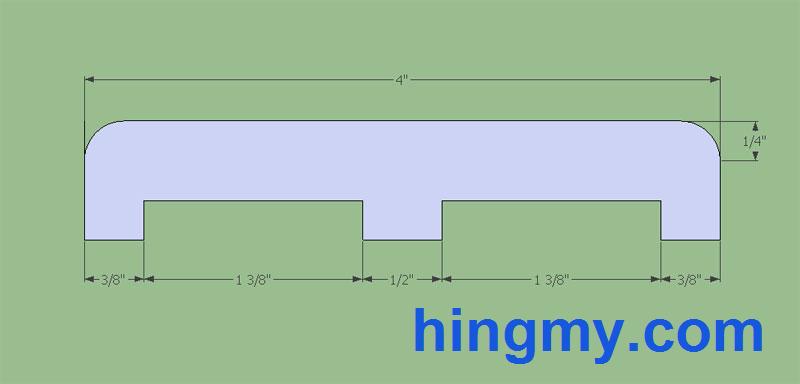
The sides are simple horizontal strips. The front edges are rounded over with a 1/4" bit. The width depends on your taste and the materials available. I purchased 8" wide boards from my lumberyard. Cutting two side pieces from each board, set my piece's width to a little under 4".
To keep the pieces from cupping, one or two relief channels must be cut in the back of the piece. These channels release some of the pressure in the piece and make it easier to install the pieces on an out-of-square wall.
Placement of the channels is not an exact science. Leave 1/4" to 3/8" of material at the edges. The depth of the channels should be about 1/4 to 1/3 of the thickness of the piece. The channels can be cut with a dado blade on the table saw, or with a slot cutter on the router table.
Cut each piece about 2-3" longer than the required height. This will give the finish carpenter enough material to work with when installing the pieces on the door.

Building the header
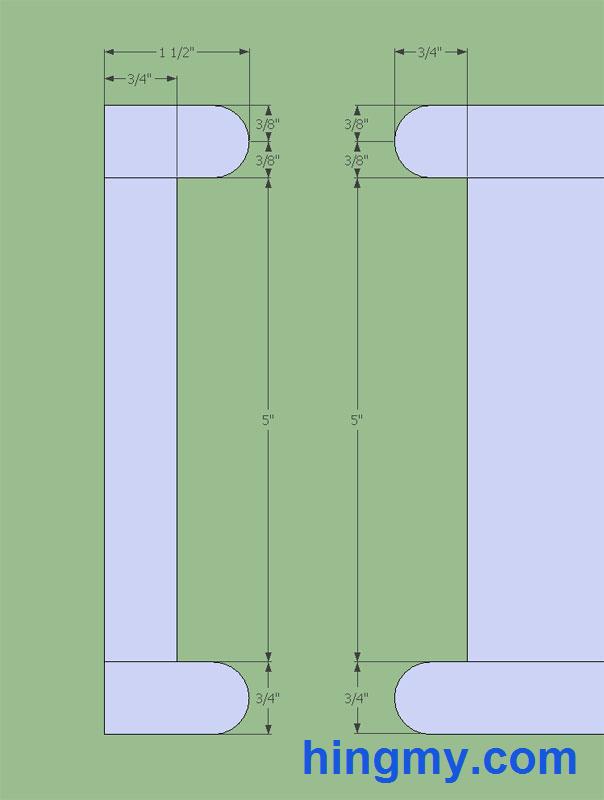
The header is built from two strips of wood sandwiched around a large piece of MDF. The strips are rounded over with a 3/8" bit on the front edge. The side edges of the MDF panel are rounded over with a 1/4" bit.
Using MDF for the header is not a durability concern. The header is so far above daily life, it is unlikely to see any abuse during its lifetime.
The round over on the ends of the strips are batch cut. Begin by rounding over the ends of a blank with the 3/8" bit. Then rip several strips from this board on the table saw. Then round over the long sides of each strip. Doing the round over in the end grain before ripping the strip eliminates tear out and speeds up the process. Sand each strip and put it aside.
The MDF panel is a simple square panel with a round over on each side. Cut it from a larger sheet and round over the edges.
To save time onsite, assemble the header in your shop. Glue the strips to the panel. Either clamp the assembly or use nails to hold the strips in place until the glue dries.
Finishing
Painting around trip takes time and a steady hand. A lot of time can be saved by priming and painting the trim in the shop. If done correctly, only light touch-up work is required after installation.
Prim each piece with an interior primer. Let the primer dry. Sand lightly to remove dust embedded in the primer. Apply the first of two topcoats. Let that coat dry, and repeat the process. No sanding is required after the final coat.
Don't skip the sanding step between coats. Consistently doing this increases the quality of the paint job dramatically. Get into the habit.
Assembly
Installation begins with the sides. The casing is installed with a reveal of 1/8" to 1/4" all around. Cut each side to length individually. Don't assume the left and right side are the same length. Pin each piece in place with 2" finish nails driven into the door frame (not into the door casing).
The header is simple to install. Place it on top of the sides. It should stay in place without aid. Pin it in place with a few finish nails driven into the framing above the door.
Caulk around the entire perimeter of the casing with paintable caulk. Fill any gaps between the trim and door casing with caulk. Fill the nail holes with wood putty. Sand the putty after it dries and touch up the paint. The caulk lines will become invisible after the paint dries.
Summary
Custom door and window frames are a simple and fast way to improve the quality of any room. With a table saw and router you can create the trim pieces and header from inexpensive materials. The result will look much better than what you can buy off the shelve.


